Get Creative with Your Custom Template
To personalise your coaster (or any custom product from Axis), you’ll need to use Inkscape (or similar) —a free, beginner-friendly design tool that works on Windows, Mac, and Linux. This guide walks you through the basic steps: installing Inkscape, opening your Axis-supplied design template, adding your graphics or text, and exporting your file so we can laser-etch it exactly as you intended.
If you’ve never used design software before, don’t worry—we’ve kept this beginner-friendly.
🎥 Pro Tip: Before you begin, we recommend watching a few short tutorials on YouTube.
Here’s a good one to get started: https://www.youtube.com/watch?v=fzk-suGcqrc
Download this free template and give it a go:
Step 1: Download and Install Inkscape
-
Go to the official Inkscape website: https://inkscape.org
-
Click “Download” and choose your operating system:
-
Windows: Choose the installer for your version and run it.
-
macOS: Download the .dmg file, open it, and drag Inkscape into your Applications folder.
-
Linux: Follow the flatpak or package instructions listed on the site.
-
-
Launch Inkscape once installed.
Step 2: Open Your Design Template
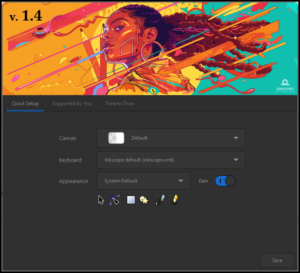
When Inkscape opens, you may see a welcome screen like this:
-
Click “Time to Draw”.
-
Choose “Browse for other files…”
-
Find the .SVG file you downloaded from the Axis website (e.g. axis-heart-template.svg).
-
Click Open.
Skip to Step 4 if you’ve already done this.
Step 3: (Alternate Method) Open the Template via File Menu
-
In Inkscape, go to File > Open.
-
Locate the Axis template you downloaded.
-
Click Open.
-
The design area (e.g. Axis Shield Template) will load with boundary outlines.
💡 Tips:
- Do not move or resize the outer shape—it defines your product’s cutting/etching area.
- To prevent accidental edits, open the Layers and Objects panel and lock the shape layer.
Step 4: Design Your Graphics
Now for the fun part—add your custom touch.
✍️ Add Text
-
Select the Text Tool (A icon or press T).
-
Click inside the design area and type your message (e.g. Designed to Endure).
-
Use the top toolbar to adjust font, size, alignment.
-
Use the Select Tool (arrow or press F1) to reposition or resize.
✏️ Draw Freehand
-
Choose the Draw Freehand Tool (pencil icon).
-
Click and drag to sketch lines or doodles.
-
Adjust line weight via Object > Fill and Stroke.
🖼️ Import an Image
-
Go to File > Import.
-
Choose a supported image file (.PNG, .JPG, .SVG).
-
Select “Embed” when prompted.
-
Resize and position your image inside the template.
-
For best results, trace bitmap images:
-
Select the image.
-
Go to Path > Trace Bitmap.
-
Adjust settings and click OK.
-
Delete the original bitmap if needed.
-
💡 Make sure all artwork stays inside the shape boundary.
🛠️ Finalise Your Design
-
Click on each object.
-
Go to Path > Object to Path — this converts your graphics into laser-ready vectors.
Step 5: Save and Export Your Design
-
Go to File > Save As.
-
In the “Save as type” dropdown, choose Plain SVG (.svg) – this is critical.
-
Name your file (e.g. Shield Coaster.svg) and save it somewhere easy to find.
Step 6: Email Your Design to Axis
Once saved, email your file to us along with your Sales Order Number.
We’ll confirm the file looks good and start prepping your custom piece for laser etching.
Q: Can I use Canva or Photoshop instead of Inkscape?
A: You can, as long as you send us a vector-based file (.SVG, .PDF, .AI etc), but you are fully responsible for making sure your layout, size, and design match our template exactly.
Q: I’m not sure if my file looks right—can you check it?
A: Absolutely. Just email it to us and we’ll take a quick look before we etch.